Introduction
In this article, we will learn about how to add and remove columns dynamically using angular js with MVC applications. As before angular js, the same thing was performed using jQuery which was very lengthy and time-consuming. The same functionality is performed using angular js in a very short time and very much faster than jQuery.
Recommended Prerequisites
- Visual Studio 2017
- ASP.NET MVC
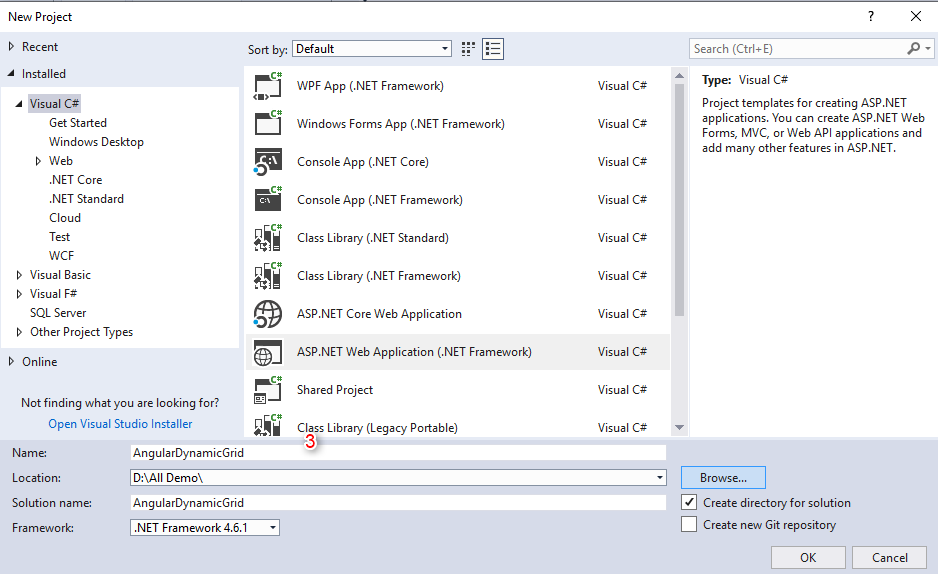
Open Visual Studio and select “File” >> “New”. Then click on Project. (Remember, don’t go with the option ‘File->New->Website’.)

Select “Templates” >> Visual C# >> Web then ASP.NET Web Application (.NET Framework), and put appropriate project name.
- And click the “OK” button.

Now choose the project template as MVC

Now, your project will begin to start once you click OK button.
Great. Now first we will see the project structure in which we will work. So our solution explorer will look something like this.

Now let’s code the amazing design.
First we will begin with HTML file i.e. Go to View -> Home -> Index.cshtml
@{
ViewBag.Title = "Home Page";
Layout = null;
}
<!DOCTYPE html>
<html>
<head>
<title>AngularJS</title>
<meta charset='utf-8'>
<meta name="description" content="AngularJS and Angular Code Example">
<link rel="stylesheet" href="https://netdna.bootstrapcdn.com/bootstrap/3.0.0/css/bootstrap.min.css">
<link href="~/Content/css/style.css" rel="stylesheet" />
<script type="text/javascript" src="https://ajax.googleapis.com/ajax/libs/angularjs/1.4.4/angular.min.js"></script>
<link rel="stylesheet" href="https://cdnjs.cloudflare.com/ajax/libs/font-awesome/4.7.0/css/font-awesome.min.css">
<script src="~/Scripts/app/main.js"></script>
</head>
<body ng-app="demo" ng-controller="DemoCtrl">
<div class="container" width="800px" id="invoice">
<div class="row">
<div class="col-xs-12 heading">
Dynamic Grid in Angular JS
</div>
</div>
<div class="items-table">
<div class="row header">
<div class="col-xs-1"> </div>
<div class="col-xs-5">Title 1</div>
<div class="col-xs-2">Title 2</div>
<div class="col-xs-2">Title 3</div>
</div>
<div class="row invoice-item" ng-repeat="item in invoice.items" ng-animate="'slide-down'">
<div class="col-xs-1 remove-item-container">
<a href ng-click="removeItem(item)" class="btn btn-danger"><i class="fa fa-times"></i></a>
</div>
<div class="col-xs-5 input-container">
<input ng-model="item.description" placeholder="Description" />
</div>
<div class="col-xs-2 input-container">
<input ng-model="item.qty" value="1" size="4" ng-required ng-validate="integer" placeholder="Quantity" />
</div>
<div class="col-xs-2 input-container">
<input ng-model="item.cost" value="0.00" ng-required ng-validate="number" size="6" placeholder="Cost" />
</div>
</div>
<div class="row invoice-item">
<div class="col-xs-12 add-item-container">
<a class="btn btn-primary" href ng-click="addItem()"><i class="fa fa-plus"></i></a>
</div>
</div>
</div>
</div>
</body>
</html>
Here, we have included the CDN for angularjs, bootstrap, and font-awesome.
Our angularjs controller name is DemoCtrl and the app module name is a demo.
Now let’s code our angular js file and name it as main.js in location path of Script -> app -> main.js
angular.module('demo', [])
    .service('LocalStorage', [function () {
        var Service = {};
        var hasInvoice = function () {
            return !(localStorage['invoice'] == '' || localStorage['invoice'] == null);
        };
        Service.getInvoice = function () {
            if (hasInvoice()) {
                return JSON.parse(localStorage['invoice']);
            } else {
                return false;
            }
        };
        return Service;

    }])
    .controller('DemoCtrl', ['$scope', '$http', 'LocalStorage',
        function ($scope, $http, LocalStorage) {

            (function init() {
                !function () {
                    var invoice = LocalStorage.getInvoice();
                    $scope.invoice = invoice ? invoice : 0;
                }();
            })()
            $scope.addItem = function () {
                $scope.invoice.items.push({ qty: 0, cost: 0, description: "" });
            }
            $scope.removeItem = function (item) {
                $scope.invoice.items.splice($scope.invoice.items.indexOf(item), 1);
            };
        }])
Now finally we will add some CSS to our view so that it will look somehow better.
So now move on to Content -> css-> style.css
.items-table .row {
  border-bottom:1px solid #ddd;
  line-height:3em;
}
.items-table .row:last-child {
  border-bottom:none;
  line-height:3em;
}

.items-table .row:nth-child(even) {
  background:#f9f9f9;
}
.items-table input {
  line-height:1.5em;
}

input:focus {
  outline: 0;
}

.heading {
  background-color:#357EBD;
  color:#FFF;
  margin-bottom:1em;
  text-align:center;
  line-height:2.5em;
}
.right input {
  text-align:right;
}
.input-container {
  padding:3px 0;
}

.header.row {
  font-weight:bold;
  border-bottom:1px solid #ddd;
  border-top:1px solid #ddd;
}

input, textarea{
  border: 1px solid #FFF;
}

.container input:hover, .container textarea:hover,
.table-striped > tbody > tr:nth-child(2n+1) > td input:hover,
.container input:focus, .container textarea:focus,
.table-striped > tbody > tr:nth-child(2n+1) > td input:focus{
  border: 1px solid #CCC;
}

.table-striped > tbody > tr:nth-child(2n+1) > td input{
    background-color: #F9F9F9;
    border: 1px solid #F9F9F9;
}

body{
  padding:20px;
}

.infos input{
  width: 300px;
}

.align-right input{
  text-align:right;
  width: 300px;
}

div.container{
  width: 800px;
}
Now that’s it. Run the project and the output will look somewhat like this.

Summary
You can leave feedback/comments/questions to this article. Please let me know how you like and understand this article and how I could improve it. You can get the source code from here.


