
Here, we will learn about how we can customize the Identity Framework tables using the code first approach. If you have no idea about code first approach then you can refer our article to see how to use code first approach.
Let’s get started with our application.
Create a new project
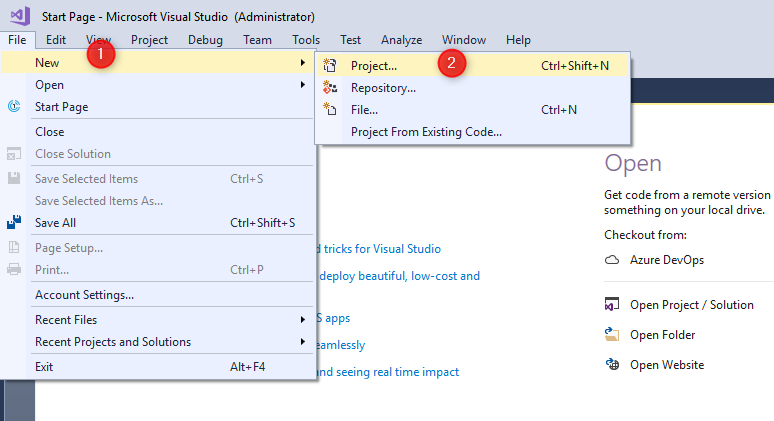
Choose ASP.NET Web Application

Choose the MVC and Change Authentication to Individual user Account and click OK

Open the Web.Config files present at the root directory and replace the old connection string with this connection string.
<add name="DefaultConnection" connectionString="Server=DESKTOP-CGB025P;Initial Catalog=IdentityDB;Persist Security Info=False;User ID=sa;Password=******;MultipleActiveResultSets=True;Encrypt=False;TrustServerCertificate=False;Connection Timeout=30;" providerName="System.Data.SqlClient" />
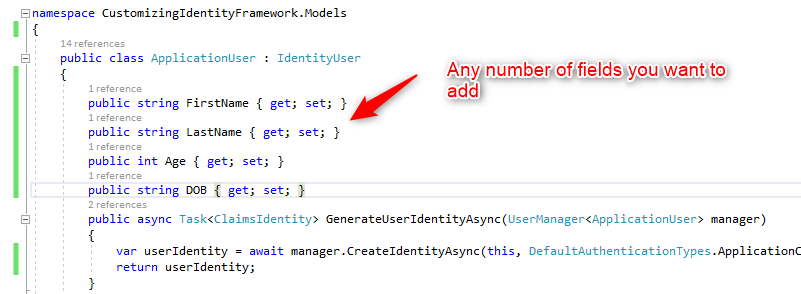
Navigate to Models -> IdentityModel.cs file and replace the code
using System.Security.Claims;
using System.Threading.Tasks;
using Microsoft.AspNet.Identity;
using Microsoft.AspNet.Identity.EntityFramework;

namespace CustomizingIdentityFramework.Models
{
    public class ApplicationUser : IdentityUser
    {
        public string FirstName { get; set; }
        public string LastName { get; set; }
        public int Age { get; set; }
        public string DOB { get; set; }
        public async Task<ClaimsIdentity> GenerateUserIdentityAsync(UserManager<ApplicationUser> manager)
        {
            var userIdentity = await manager.CreateIdentityAsync(this, DefaultAuthenticationTypes.ApplicationCookie);
            return userIdentity;
        }
    }

    public class ApplicationDbContext : IdentityDbContext<ApplicationUser>
    {
        public ApplicationDbContext()
            : base("DefaultConnection", throwIfV1Schema: false)
        {
        }

        public static ApplicationDbContext Create()
        {
            return new ApplicationDbContext();
        }
    }
}
Navigate to Models -> AccountViewModel.cs file and add the fields in RegisterViewModel class
public class RegisterViewModel
    {
        [Required]
        [EmailAddress]
        [Display(Name = "Email")]
        public string Email { get; set; }

        [Required]
        [StringLength(100, ErrorMessage = "The {0} must be at least {2} characters long.", MinimumLength = 6)]
        [DataType(DataType.Password)]
        [Display(Name = "Password")]
        public string Password { get; set; }

        [DataType(DataType.Password)]
        [Display(Name = "Confirm password")]
        [Compare("Password", ErrorMessage = "The password and confirmation password do not match.")]
        public string ConfirmPassword { get; set; }
        public string FirstName { get; set; }
        public string LastName { get; set; }
        public int Age { get; set; }
        public string DOB { get; set; }
    }

Finally come to AccountController and find Register method and add code in it.
[HttpPost]
        [AllowAnonymous]
        [ValidateAntiForgeryToken]
        public async Task<ActionResult> Register(RegisterViewModel model)
        {
            if (ModelState.IsValid)
            {
                var user = new ApplicationUser { UserName = model.Email, Email = model.Email,FirstName=model.FirstName,LastName=model.LastName,Age=model.Age,DOB=model.DOB };
                var result = await UserManager.CreateAsync(user, model.Password);
                if (result.Succeeded)
                {
                    await SignInManager.SignInAsync(user, isPersistent:false, rememberBrowser:false);
                    return RedirectToAction("Index", "Home");
                }
                AddErrors(result);
            }

            // If we got this far, something failed, redisplay form
            return View(model);
        }

Add the HTML for the fields in View -> Account -> Register.cshtml
@model CustomizingIdentityFramework.Models.RegisterViewModel
@{
    ViewBag.Title = "Register";
}

<h2>@ViewBag.Title.</h2>

@using (Html.BeginForm("Register", "Account", FormMethod.Post, new { @class = "form-horizontal", role = "form" }))
{
    @Html.AntiForgeryToken()
    <h4>Create a new account.</h4>
    <hr />
    @Html.ValidationSummary("", new { @class = "text-danger" })
    <div class="form-group">
        @Html.LabelFor(m => m.FirstName, new { @class = "col-md-2 control-label" })
        <div class="col-md-10">
            @Html.TextBoxFor(m => m.FirstName, new { @class = "form-control" })
        </div>
    </div>
    <div class="form-group">
        @Html.LabelFor(m => m.LastName, new { @class = "col-md-2 control-label" })
        <div class="col-md-10">
            @Html.TextBoxFor(m => m.LastName, new { @class = "form-control" })
        </div>
    </div>
    <div class="form-group">
        @Html.LabelFor(m => m.Age, new { @class = "col-md-2 control-label" })
        <div class="col-md-10">
            @Html.TextBoxFor(m => m.Age, new { @class = "form-control" })
        </div>
    </div>
    <div class="form-group">
        @Html.LabelFor(m => m.DOB, new { @class = "col-md-2 control-label" })
        <div class="col-md-10">
            @Html.TextBoxFor(m => m.DOB, new { @class = "form-control" })
        </div>
    </div>
    <div class="form-group">
        @Html.LabelFor(m => m.Email, new { @class = "col-md-2 control-label" })
        <div class="col-md-10">
            @Html.TextBoxFor(m => m.Email, new { @class = "form-control" })
        </div>
    </div>
    <div class="form-group">
        @Html.LabelFor(m => m.Password, new { @class = "col-md-2 control-label" })
        <div class="col-md-10">
            @Html.PasswordFor(m => m.Password, new { @class = "form-control" })
        </div>
    </div>
    <div class="form-group">
        @Html.LabelFor(m => m.ConfirmPassword, new { @class = "col-md-2 control-label" })
        <div class="col-md-10">
            @Html.PasswordFor(m => m.ConfirmPassword, new { @class = "form-control" })
        </div>
    </div>
    <div class="form-group">
        <div class="col-md-offset-2 col-md-10">
            <input type="submit" class="btn btn-default" value="Register" />
        </div>
    </div>
}

@section Scripts {
    @Scripts.Render("~/bundles/jqueryval")
}
Now its time to add migrations
Open the NuGet Package Manager Console and type the following commands.
Enable-Migrations
Add-Migration initial
Update-Database
Now you can go to the database and you will see that fields are added in the AspNetUsers table.
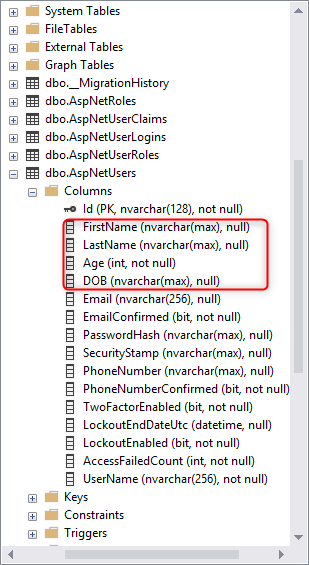
Output:

You can download the source code from here
How to add a multiselect dropdown list in register form .
its helps, Thanks